Built specifically for on-screen video tutorials — definitely not just a screen recorder.
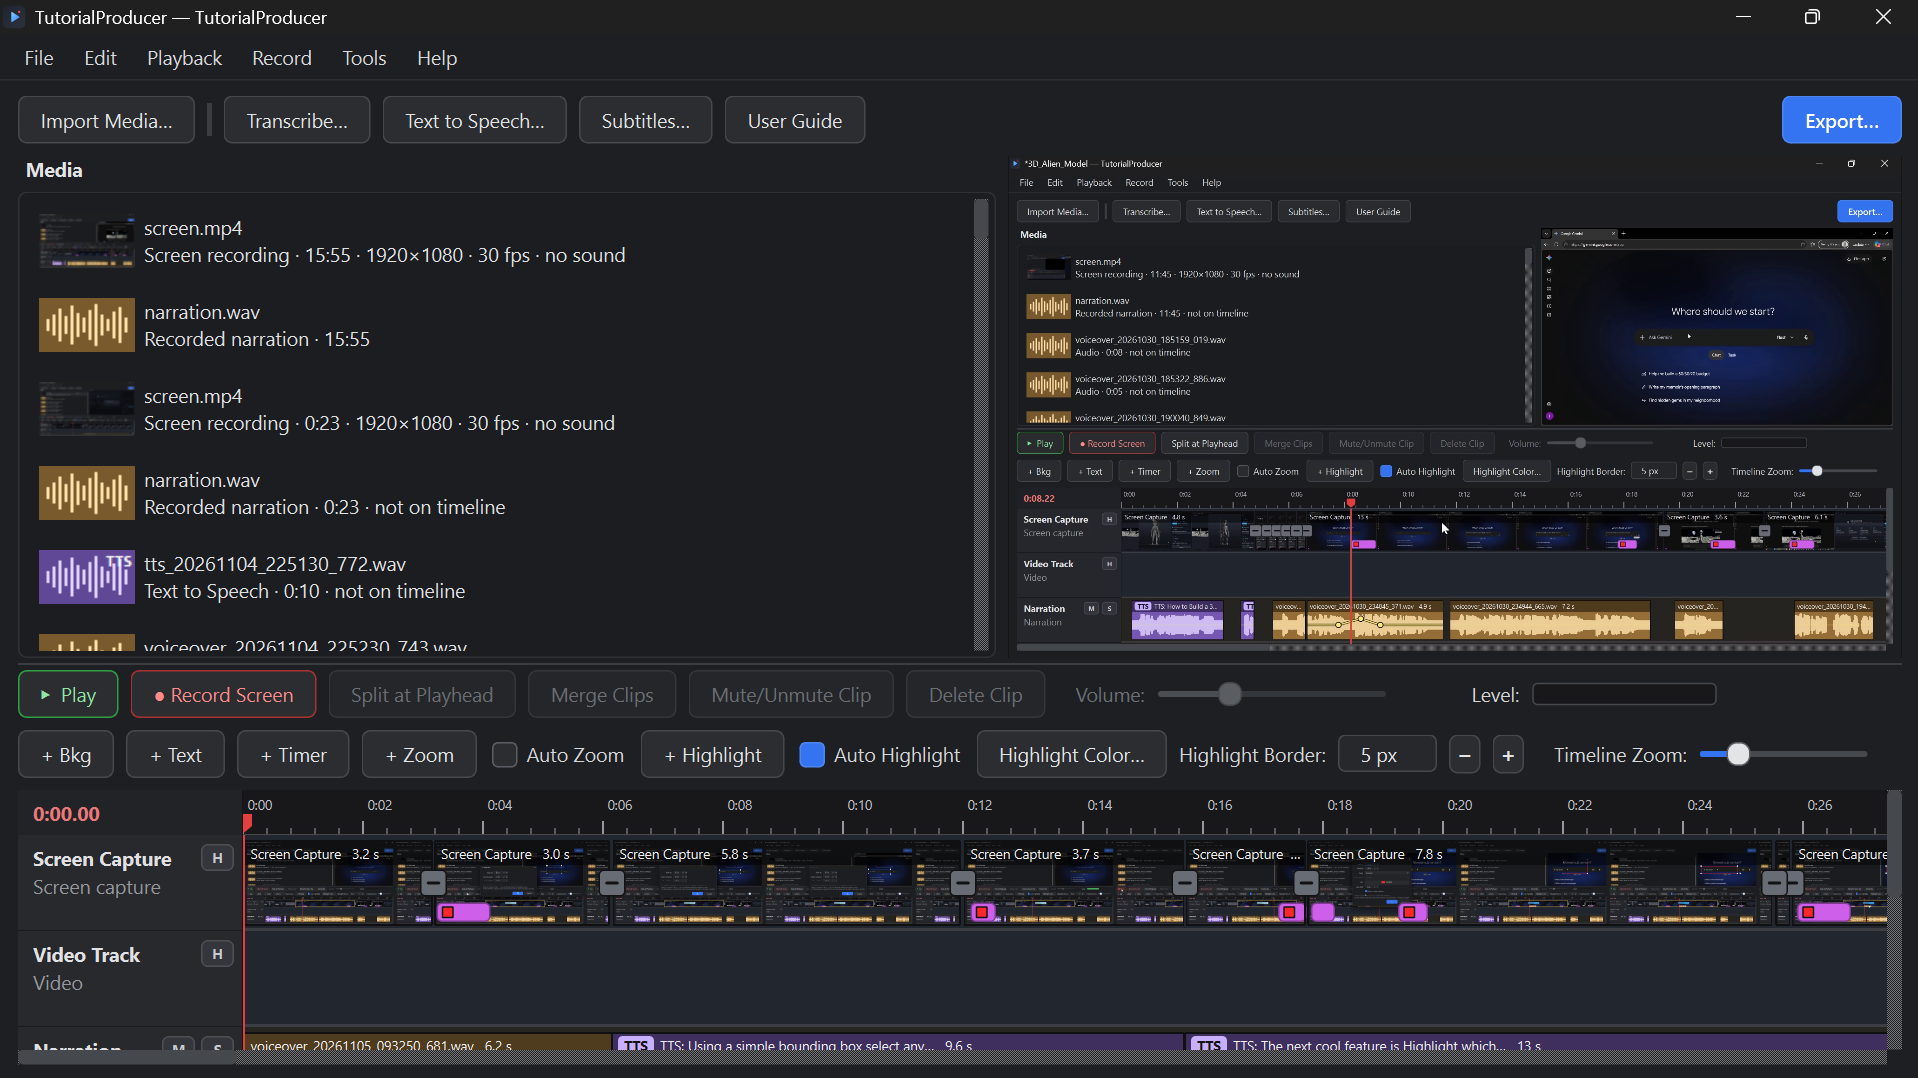
TutorialProducer isn't a general-purpose video editor — every tool in it is built for turning a screen recording into a clear, step-by-step tutorial: one-click zoom and highlight, a built-in subtitle editor, AI transcription and voiceover, and an Auto Zoom / Auto Highlight mode that adds them for you as you record.
A toolkit built for one job: screen tutorials
Every tool here is purpose-built for turning a recording into a clear walkthrough — zoom and highlight with one click, an Auto Zoom / Auto Highlight mode for hands-free editing, AI transcription and voiceover, and a subtitle editor that's actually built for this, not adapted from a general editor.
Zoom In on Objects
Draw a bounding box around anything on screen and TutorialProducer zooms in on it, keeping the object fully in frame. Drag the zoom bar on the timeline — or the pop-up's own fields — to adjust exactly when it starts and how long it holds.
Highlight Objects of Interest
Flash a colored bounding box around whatever you're describing so viewers never lose track of it. Pick your own highlight color and border width to match your brand.
Auto Zoom & Auto Highlight
Turn both on before you hit record, and every object you click gets a zoom and a highlight added automatically — no scrubbing the timeline afterward. Edit or remove any of them once you're done.
Picture-in-picture, speed & stopwatch
Right-click any clip for picture-in-picture, speed changes, an overlaid stopwatch for sped-up footage, and freeze-last-frame — handy when your narration outlasts the clip or you need a still background for on-screen text.
AI transcription & text-to-speech voiceover
Click Transcribe and your narration becomes editable text in seconds. Fix a line, pick a different AI voice, and press Generate Voiceover — the new clip drops onto the timeline and replaces the old one with a single click.
Fun on-screen text
Drop animated sticker-style captions anywhere on the frame — gradients, outlines, even per-letter coloring — for the moments plain subtitles can't carry.
Volume automation
The kind of per-clip volume automation you'd normally need a dedicated audio workstation for, built straight into every clip on your timeline.
Loop & export just a highlighted range
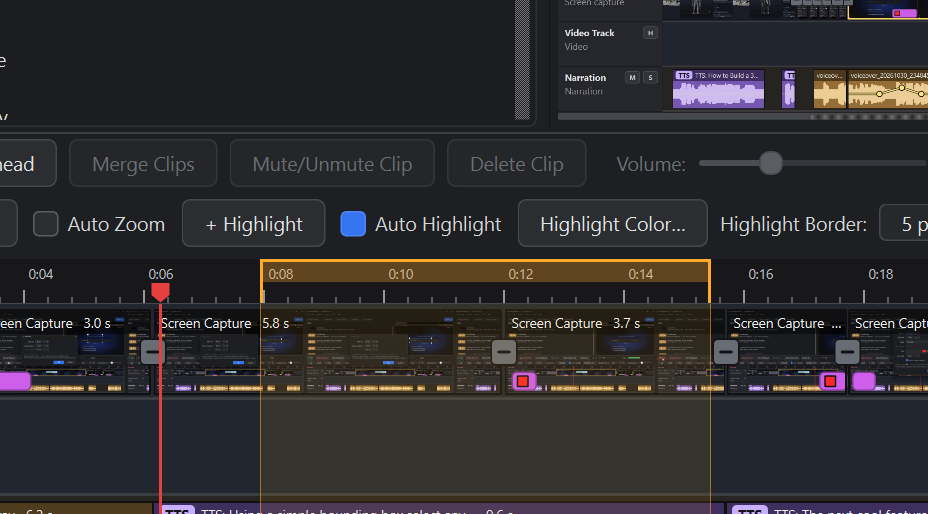
Mark a loop area on the timeline, and export will render an MP4 of only that highlighted section — perfect for a quick clip or a focused re-export.
Inside TutorialProducer
A look at the editor itself — the timeline, the dialogs, and the exports.
One price. Own it for good.
No tiers, no monthly meter on your editing software. Pay once per platform and TutorialProducer is yours.
Windows
Ready to downloadWindows 10 & 11. Installs everything TutorialProducer needs — nothing extra to download.
Buy on the Microsoft StoremacOS
In developmentA native macOS build is on the way, with the same automatic zoom, highlight and subtitle tools.
Ubuntu / Linux
In developmentBuilt for Ubuntu and other major distributions. Same engine, same price, no subscription.
Only a one-time fee of $29.99 per platform — no subscriptions, ever.
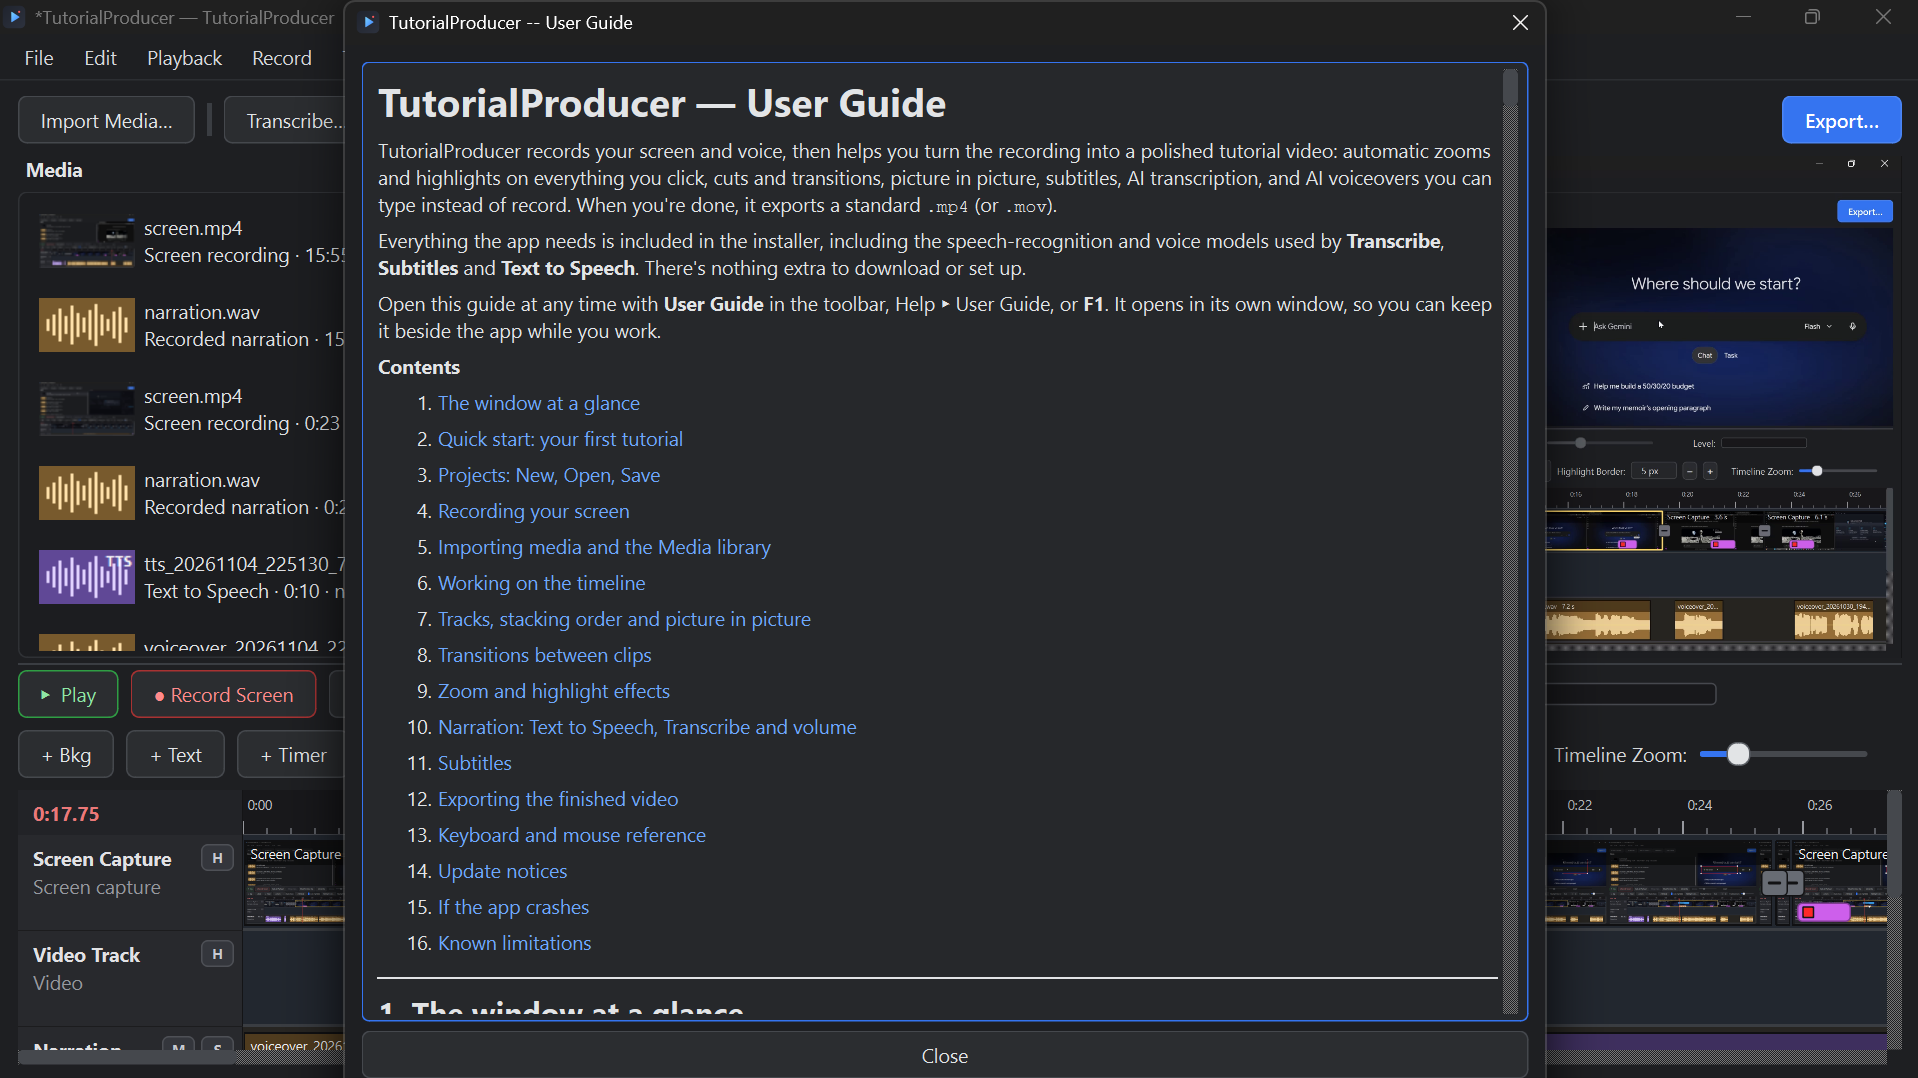
User Guide
TutorialProducer records your screen and voice, then helps you turn the take into a polished tutorial: automatic zooms and highlights on everything you click, cuts and transitions, picture-in-picture, subtitles, AI transcription, and AI voiceovers you can type instead of record. When you're done, it exports a standard .mp4 or .mov.
Everything the app needs — including the speech-recognition and voice models behind Transcribe, Subtitles and Text to Speech — ships in the installer. There's nothing extra to download or set up.
- 01The window at a glance
- 02Quick start: your first tutorial
- 03Projects: New, Open, Save
- 04Recording your screen
- 05Importing media & the Media library
- 06Working on the timeline
- 07Tracks, stacking order & picture in picture
- 08Transitions between clips
- 09Zoom & highlight effects
- 10Narration: Text to Speech, Transcribe & volume
- 11Subtitles
- 12Exporting the finished video
- 13Keyboard & mouse reference
- 14Update notices
- 15If the app crashes
- 16Known limitations
The complete guide
Every topic from the in-app guide (Help → User Guide, F1) — click any one to expand it.01The window at a glance
From top to bottom:
- Menu bar: File, Edit, Playback, Record, Tools and Help (listed below). Every command is in a menu, with its keyboard shortcut beside it.
- Toolbar: only the most-used commands: Import Media… | Transcribe…, Text to Speech…, Subtitles…, User Guide, and Export… (blue, on the right). New, Open, Save, Undo and Redo are in the menus.
- Media (left): every file in the project, with a thumbnail, its length, and for videos the size and frame rate.
- Preview (right): the video at the playhead, with zooms, highlights, picture in picture, color backgrounds, animated text, subtitles and transitions, exactly as it will look when exported.
- Controls: Play, ● Record Screen, Split at Playhead, Merge Clips, Mute/Unmute Clip, Delete Clip (closes the gap), the clip Volume slider, and the Level meter that shows how loud playback is.
- Effects row: + Bkg (color background), + Text (animated text), + Timer (stopwatch counter), + Zoom, Auto Zoom, + Highlight, Auto Highlight, Highlight Color…, Highlight Border and the Timeline Zoom slider.
- Timeline: the time ruler, the red playhead, the tracks, and a Subtitles track below the video tracks (you can add more subtitle tracks), and the Text lanes under that for animated text. A new project has four tracks:
| Track | Type | What goes there |
|---|---|---|
| Screen Capture | video | Your screen recordings |
| Video Track | video | Other videos you import |
| Narration | audio | Your recorded voice and Text to Speech clips |
| Audio Track | audio | The sound of imported videos, music, other audio |
You can add more tracks of any kind, and rename, reorder and delete them (section 7). The second line of each track header says its kind.
Sizing: the preview is always exactly as wide as its video needs at the available height (16:9 for a 1920 × 1080 project), so the picture fills it with no black bars, and the Media panel takes the rest of the width beside it, at the same height. This adjusts automatically when you resize or maximize the window. Drag the divider between the preview and the controls below to give the timeline or the preview more room. You can also drag the divider between Media and the preview; after that, the split stays where you put it. When the window is narrow, toolbar buttons wrap onto a second line instead of being cut off.
The menus
| Menu | Commands |
|---|---|
| File | New Project (Ctrl+N), Open Project… (Ctrl+O), Save Project (Ctrl+S), Save Project As… (Ctrl+Shift+S), Import Media… (Ctrl+I), Export Video… (Ctrl+E), Export Audio Only… (Ctrl+Shift+E), Export Subtitles (.srt)…, Project Settings… (video size and frame rate, microphone), Exit (Ctrl+Q) |
| Edit | Undo (Ctrl+Z), Redo (Ctrl+Y or Ctrl+Shift+Z), Select All Clips (Ctrl+A), Copy Clip (Ctrl+C), Paste Clip (Ctrl+V), Merge Clips (Ctrl+J), Split at Playhead (S or Ctrl+B), Delete (Del), Mute/Unmute Clip (M), Add Zoom (Z), Add Highlight (H). The matching toolbar buttons are labelled + Zoom and + Highlight. |
| Playback | Play / Pause (Space), Go to Start (Home), Go to End (End), Previous Frame (Left), Next Frame (Right), Back 1 Second (Shift+Left), Forward 1 Second (Shift+Right), Zoom Timeline In (Ctrl+=), Zoom Timeline Out (Ctrl+−) |
| Record | Start / Stop Recording (Ctrl+R). Ctrl+Shift+R starts and stops recording from any program (Windows). |
| Tools | Transcribe…, Text to Speech… (Ctrl+T), Subtitles… (Ctrl+Shift+T), Add Text…, Add Color Background…, Add Stopwatch Counter…, Remove All Stopwatch Counters, Clip Speed… |
| Help | User Guide (F1), Keyboard Shortcuts (Ctrl+/), About TutorialProducer (shows the version, currently 1.1, with links to PreciseAI, LLC at preciseai.tech and to more tools at toolcorral.com) |
Undo and Redo are greyed out when there's nothing to undo or redo.
On a Mac or on Ubuntu
This guide is written for Windows. Everything works the same on macOS and Ubuntu, except:
- Shortcuts on a Mac: use ⌘ Command wherever this guide says Ctrl (⌘S to save, ⌘Z to undo, ⌘E to export…). Single-letter shortcuts (S, M, Z, H, Space) are the same.
- Delete on a Mac: wherever this guide says to press Delete, press the ⌫ delete key above Return (fn+⌫ also works).
- Recording from any program with Ctrl+Shift+R works on Windows only; on a Mac or Ubuntu, use the ● Record Screen button.
- Mac permissions: macOS blocks screen recording until you allow it. Do the one-time setup in Mac: allow the permissions below before your first recording.
- Ubuntu: screen recording needs the "Ubuntu on Xorg" session: log out, click your name, click the gear icon at the bottom right and choose it, then log in. Under the default (Wayland) session everything else works, but the screen can't be recorded.
- File Explorer in this guide means Finder on a Mac and Files on Ubuntu. After an export, Open Folder opens the folder the video was saved in (on Windows, with the file selected).
Mac: allow the permissions
TutorialProducer needs macOS 13.3 or newer. macOS keeps apps that record the screen switched off until you allow them, so do this once, before your first real recording. All four settings are in System Settings ▸ Privacy & Security (open System Settings from the Apple menu):
| Setting | What it is for | If it is off |
|---|---|---|
| Screen & System Audio Recording | Recording the screen. Required. | ● Record Screen shows "Could not enumerate shareable content … Screen Recording permission hasn't been granted". |
| Microphone | Recording your voice as narration. | The recording has no voice. |
| Accessibility | Finding the button, field or menu you clicked, so Auto Zoom and Auto Highlight fit it. | Zoom and highlight boxes use a default size around each click. |
| Input Monitoring | Seeing where and when you click. | Recording works, but no click-based zooms or highlights are created. |
- Install the app first. Open the downloaded .dmg, drag TutorialProducer onto Applications, eject the disk image, and open the app from Applications. Running it from inside the disk image makes macOS forget permissions.
- Screen recording. Click ● Record Screen and start a recording. macOS says TutorialProducer would like to record the screen. Click Open System Settings, switch TutorialProducer on under Screen & System Audio Recording, and click Quit & Reopen when macOS offers it. (If it isn't in the list, click +, choose TutorialProducer from Applications, and switch it on.)
- Microphone. Start a recording again. When macOS asks to use the microphone, click Allow. If you clicked Don't Allow before, switch TutorialProducer on under Microphone in System Settings.
- Accessibility and Input Monitoring. In System Settings open Accessibility, click +, choose TutorialProducer from Applications, and switch it on. Do the same under Input Monitoring. macOS may ask you to type your password or use Touch ID.
- Quit TutorialProducer (⌘Q) and open it again. macOS applies Accessibility and Input Monitoring only to programs started after you allow them.
- Check it all works. Record about ten seconds, click a few buttons and menus, and stop. The clip should have a picture, your voice, and zoom and highlight flags where you clicked.
If a permission is switched on but still doesn't work (this can happen after updating the app): select TutorialProducer in that list, click − to remove it, add it again with +, switch it on, and restart the app. As a last resort, quit the app and run this in Terminal, then repeat steps 2 to 5:
tccutil reset All com.toolcorral.TutorialProducer
02Quick start: your first tutorial
- Click ● Record Screen (or press Ctrl+R). Choose what to record (whole screen, one window or part of the screen) and click ● Start Recording (section 4). Do your demo, talking through it and clicking the things you're describing.
- Click ■ Stop Recording (or press Ctrl+Shift+R from any program).
- The video lands on Screen Capture and your voice on Narration, with a highlight on every click (and a zoom too, if Auto Zoom was ticked). The narration's volume is evened out automatically.
- Press Space to watch it back. Adjust or remove effects (section 9).
- Cut out mistakes: put the playhead on a cut point, press S (Split at Playhead), select the unwanted piece and press Delete.
- Optional: add narration with Text to Speech…, fix what you said with Transcribe…, add Subtitles….
- Save the project (File ▸ Save, Ctrl+S) so you can come back to it.
- Click Export…, check the settings and choose where to save.
Undo (Edit menu, Ctrl+Z) steps back through every change.
03Projects: New, Open, Save
A project (.tproj file) remembers everything: the media library, all
tracks and clips, effects, transitions, subtitles and settings. These
commands are in the File menu. The media
files themselves stay where they are; the project points to them. If you
move a project folder together with its media, the project still finds
them.
- New (Ctrl+N) starts an empty project.
- Open… (Ctrl+O) opens a saved project. You can also double-click a
.tprojfile, or drop one on the app's icon. - Save (Ctrl+S) saves to the current file; the first time it asks where. Save Project As… (Ctrl+Shift+S) saves a copy under a new name.
- The window title shows the project's name, with a * in front when there are unsaved changes.
- Unsaved changes: if you start a new project, open another one, or close the app with unsaved changes, the app asks whether to Save, Don't Save or Cancel.
- Autosave: every two minutes, unsaved work is also saved to a recovery file. If the app closes unexpectedly, the next time it starts it offers to bring that work back.
Project Settings
File ▸ Project Settings… has two parts.
Video: the frame rate and video size used for preview and export. By default, Match the first video I import or record is on, so a project automatically takes the size and frame rate of its first video (for example 1920 × 1080 at 29.97 fps). That includes recordings: if your first recording is of part of the screen, say 1280 × 720, the project becomes 1280 × 720. You can change the size here or when exporting.
Microphone:
- Record from: the microphone used for every recording: the system's default, a specific microphone, or No microphone (records the screen without sound).
- Test: while the window is open, the bar shows how loud the chosen microphone hears you. Speak normally: the bar should reach the yellow part. If it stays low, move closer or raise the microphone's level in your system's sound settings (Windows: Settings ▸ System ▸ Sound; macOS: System Settings ▸ Sound ▸ Input; Ubuntu: Settings ▸ Sound); if it reaches red, it's too loud.
- Even out the volume of each recording (on by default): when you stop recording, the narration clip's volume is set automatically so it is as loud as typical online video (−16 LUFS). You can still change it with the Volume slider.
The microphone settings apply to all projects. The microphone can also be chosen and tested in the Record Screen window; both places share one setting. Click Save to keep your changes, or Cancel to leave everything as it was.
04Recording your screen
Record Screen / Stop Recording
Click ● Record Screen (Ctrl+R, or Record ▸ Start / Stop Recording). The Record Screen window opens with the recording settings (below); check them and click ● Start Recording, or Cancel to not record. The window closes and recording starts a moment later, so the window itself never appears in the recording. The button then becomes ■ Stop Recording; click it (or press Ctrl+R) to stop.
On Windows, Ctrl+Shift+R starts and stops recording even while another program is in front, so you never have to switch back to TutorialProducer mid-demo. Started this way, it skips the settings window and uses the settings you chose last time.
When you stop, the recording is added to the timeline: video on Screen Capture, voice on Narration, after anything already there. Both also appear in the Media library, so you can reuse them later. If Even out the volume of each recording is on (Project Settings ▸ Microphone, on by default), the narration's volume is set to the standard level straight away.
Recording settings
These are in the window that opens when you click ● Record Screen. Record always starts on Whole screen. The other choices are remembered for next time, and so are the last window and area you picked (a window is found again by its title), so switching back to them takes one click.
| Setting | Choices |
|---|---|
| Record | Whole screen, One window (pick it from the list; Refresh updates the list), or Part of the screen (click Select Area… and drag a rectangle) |
| Video size | Full resolution, or scaled down to 1440p, 1080p or 720p for smaller files |
| Frame rate | 15, 24, 30 or 60 fps (30 is a good default for tutorials) |
| Quality | Medium, High (recommended), Maximum |
| Microphone | The default microphone, a specific microphone, or no microphone. The Test bar below it shows how loud it hears you; speak normally and it should reach the yellow part. This is the same setting as in File ▸ Project Settings, so changing it in either place changes both. |
The video is captured at a steady frame rate and encoded on the graphics card when one is available, so recordings play back smoothly.
Choosing part of the screen
- Set Record to Part of the screen (draw an area).
- Click Select Area…. The Record Screen window gets out of the way and the screen darkens.
- Drag a rectangle over what you want to record. Its size in pixels is shown above it as you drag. Areas smaller than 16 × 16 pixels are ignored, so you can just drag again.
- Let go of the mouse. The Record Screen window comes back and shows the area, for example "1280 × 720 at (200, 150)".
To cancel without changing the area, press Esc or right-click. The area is remembered for the next recording. It is on the main monitor.
While recording
While you record the whole screen or part of it, a red frame shows exactly what is being recorded, with a ● Recording tag next to it:
- Part of the screen: the frame sits just around the selected area and the rest of the screen is dimmed, so you can see at a glance what will be in the video.
- Whole screen: the frame runs along the edges of the screen. On Ubuntu and macOS the frame takes the outermost 3 pixels of the screen and the recording is everything inside it (for example 1914×1074 on a 1920×1080 screen), because those systems can't keep a window out of a recording; there is no ● Recording tag there. With more than one monitor, the whole desktop is recorded and no frame is shown.
- One window: Windows draws its own yellow border around that window.
The frame, the tag and the dimming are never in the recording, and they don't get in the way: clicks and typing go straight through to the programs underneath. They disappear when you stop recording. (On older versions of Windows 10 that can't keep them out of the recording, Windows' own yellow border is shown instead.)
Things to know:
- With Whole screen, the TutorialProducer window is recorded too if it's visible. Minimize it, or record a single window or area instead.
- Clicks outside the recorded window or area don't create effects.
- The taskbar works as usual while recording: if it's set to hide automatically, it still slides up when you move the pointer to the screen edge (and is recorded if it's on screen).
- Recordings are kept in the app's data folder:
%APPDATA%\TutorialProducer\recordingson Windows,~/Library/Application Support/TutorialProducer/recordingson macOS, and~/.local/share/TutorialProducer/recordingson Ubuntu.
Auto Zoom and Auto Highlight
Set these two checkboxes before recording. Auto Highlight starts on, Auto Zoom off.
- Auto Zoom: every click gets a smooth zoom on the control you clicked. Several quick clicks close together become one zoom that glides between them.
- Auto Highlight: every click gets a box around the same control, in the current highlight color and border.
TutorialProducer asks the program you clicked in which control is under the pointer (a button, toggle, link, menu item...). Web pages, the Ubuntu dock and top bar, and some programs don't always say. Then TutorialProducer finds the control in the picture at the moment of the click: the icon, button, tab, field or link under the pointer. A click on empty space, where there's nothing to point at, gets no highlight.
Each highlight starts a moment (0.3 s) before its click, so viewers see the box on the control just as it's pressed, before the screen changes.
Auto effects are ordinary effects: move, edit or delete them like any other.
05Importing media and the Media library
Click Import Media… in the toolbar (or press Ctrl+I) and choose one or several video and audio files at once. They're added to the Media library; nothing is placed on the timeline yet. You can also drag files from File Explorer onto the window.
To use a file:
- Drag it from the library onto a track, at the time you want. A dashed line shows where it will land. Videos go on video tracks, audio on audio tracks.
- Or double-click it to add it at the playhead, on a free track of the right kind.
A video with sound becomes two linked clips: the picture on a video track and its sound on an audio track (not on Narration). Linked clips move, split and delete together.
The library keeps every file even after you delete all its clips from the timeline, so you can add it again any time. Right-click a library item to add it to the timeline at the playhead, import more files, or remove it from the project (which also removes its clips). It also offers Rename… and Show in Folder. The library is saved with the project.
When you import or record the project's first video, the project takes on that video's size and frame rate (see Project Settings in section 3), so nothing is resized or re-timed.
06Working on the timeline
The playhead and playback
- Space plays and pauses. Playback stops at the end of the last clip.
- Move the playhead: click or drag in the ruler, or grab the red line anywhere along its length, in any track, and drag it. The time labels sit in the top half of the ruler and the playhead's handle below them, so the labels are never covered.
- The ruler and the track names stay in view while you scroll, and the current time is shown in the top-left corner.
- Left / Right arrows step one frame; Shift+Left / Shift+Right jump one second; Home / End go to the start / end.
- Timeline Zoom slider (or Ctrl+= / Ctrl+−): spread the timeline out for precise work or squeeze it to see more. Zooming keeps the playhead where it is on screen.
- Dragging near the edge: while you drag a clip (or the playhead, a trim handle, an effect, a subtitle or a text) and hold the mouse near the left or right edge of the timeline, the timeline scrolls that way; the closer to (or past) the edge, the faster.
Clips
Each clip shows its name and length at its top-left. Video clips show thumbnails, audio clips a waveform. Text to Speech clips are a different color and marked TTS. Rest the mouse on any clip for a tooltip with its full name, source file, start time and length.
- Click a clip to select it (yellow outline). Ctrl+click to select several. Click empty space to select nothing.
- Right-click a clip for its menu: Rename…, Edit Text / Voice (regenerate)… (TTS clips), Picture in Picture… (video clips), Normalize Volume (audio clips), Create Subtitles from This Clip…, and on audio clips Add Volume Point at Playhead, Fade In / Fade Out (1 s), Reset Volume Line & Fades and Save Clip Audio As…; then Mute, Split at Playhead, Delete Clip.
Moving and reordering clips
- Drag a clip to move it. It moves freely past other clips; when you let go:
- dropped on the first half of another clip, it goes before that clip;
- dropped on the second half, it goes after it;
- any clips it would overlap move later to make room. This is how you reorder narration and TTS clips.
- Another track: drag a clip up or down onto another track of the same kind. The track lights up and the clip is drawn there while you drag.
- Several clips: Ctrl+click them, then drag one; they move together.
- While dragging, a clip's edges snap to other clips' edges.
A clip's zooms and highlights travel with it.
Trimming: drag a clip's ends
Point at the left or right end of any clip (the pointer becomes a double arrow) and drag:
- inwards to cut off the start or the end;
- back out to bring the cut part back, up to the clip's full length.
Nothing is deleted: the full recording is still there, so you can change your mind at any time. A video and its own sound (linked clips) are trimmed together. Trimming the start keeps the rest of the clip where it is on the timeline, and its zooms and highlights stay on the same moments. Zooms and highlights in the cut part are kept, just hidden: drag the end back out and they're back at their full length, in the preview and the export, even if the trim stopped halfway through one. Where a zoom or highlight runs up to the clip's end, grabbing that end (including over the zoom/highlight block) trims the clip, not the block. The end snaps to other clips' edges and the playhead, it stops at the next clip on the same track, and a tooltip shows the new length. Undo (Ctrl+Z) reverses a trim.
Split, mute, delete
- Split at Playhead (S or Ctrl+B): cuts the selected clip at the playhead, or every clip under the playhead if the selected one isn't there. A video's linked sound is cut too.
- Mute/Unmute Clip (M): silences the selected clip.
- Delete: select the clip and press Delete (asks first) or click Delete Clip (right-click works too). Delete All closes the gap: later clips and everything on the other tracks move earlier together. A video clip also offers Delete Only Video and an audio clip Delete Only Audio: that removes just the selected clip (not its linked partner), leaves the gap and moves nothing else, so narration, music, text and subtitles stay put. Cancel deletes nothing. Undo brings it back.
- Copy and paste: select a clip (its linked picture/sound comes with it) and press Ctrl+C (Edit ▸ Copy Clip), then Ctrl+V (Edit ▸ Paste Clip). The copy lands on the same track right after the clip, and later clips move along to make room. Paste again to add another copy after the last one. Copies keep the clip's speed, volume, fades, zooms and highlights; they start with no transition and no stopwatch.
- Speed: right-click ▸ Speed… to speed up or slow down a clip (section 11C).
Track height
Drag the thin line at the bottom of a track to make it taller or shorter.
07Tracks, stacking order and picture in picture
Track header buttons
Each track header has small buttons:
- M (audio tracks): mute the whole track.
- S (audio tracks): solo. Only soloed tracks are heard.
- H (video tracks): hide the track's picture.
- H (subtitle tracks): hide that track's subtitles in the preview,
the exported video and the
.srt.
Adding, renaming, reordering, deleting
Right-click a track header (or empty space in a lane):
- Add Screen Capture Track / Add Video Track / Add Narration Track / Add Audio Track / Add Subtitles Track. Each kind works like the original of its kind: new recordings go to a Screen Capture track, and recorded narration and Text to Speech go to a Narration track. When there are several, they go to the one whose clip is selected, otherwise the first. The second line of each track header says its kind (Screen capture, Video, Narration, Audio).
- Rename "…" (or double-click the track name)
- Track Volume… (audio tracks): a volume for the whole track, on top of each clip's own volume.
- Move Up / Move Down: video tracks stay above audio tracks.
- Delete Track… (asks first; deletes its clips too, Undo restores them).
Stacking order
When clips on several video tracks overlap in time, the track nearest the top is the one you see, just like layers in an image editor. To show a different video on top, move its track up (Move Up (shows on top)).
Picture in picture
To show one video as a small picture over another (for example a webcam over a screen recording):
- Put the inset video on a video track above the main video, at the same time on the timeline.
- Right-click the inset clip ▸ Picture in Picture….
- Tick Show this clip as a small picture over the video below it, then choose the Size and a Position (corners, center, or Custom with the left/right and top/bottom sliders).
The clip shows a PiP tag on the timeline, and the inset appears in the preview and the export with a thin border.
08Transitions between clips
Wherever one video clip starts exactly where another ends, a small square icon sits on the join. The two clips can be on the same video track or on different video tracks. Right-click the icon and choose a transition. The icon shows a dash for a plain cut and turns amber with a dot when a transition is set. The same menu has a Length submenu (0.5 to 3 seconds; 1 second by default):
| Transition | What you see |
|---|---|
| No Effect | A straight cut (the default). |
| Fade Out | The first clip fades to black, then cuts to the next. |
| Fade In | Cuts to black, then the next clip fades up. |
| Wash Out | Fades to white, and the next clip emerges from white. |
| Cross Dissolve | The two clips blend smoothly into each other. |
| Ripple Dissolve | The clips blend through a wavy ripple. |
| Iris In | The next clip appears through a growing circle. |
| Iris Out | The first clip shrinks away inside a closing circle. |
| Jump Cut | A straight cut (an editing style rather than a visual effect). Older projects that used "Cutaway" now show Jump Cut, which behaved the same. |
To make two clips touch, drag one toward the other; edges snap together.
09Zoom and highlight effects
Effect blocks on the timeline
Each effect is shown on its clip as a block that runs for as long as the effect lasts, labeled with its type and length:
- Zoom blocks are blue.
- Highlight blocks are violet (so they're never confused with the red playhead).
| To… | Do this |
|---|---|
| Select an effect | Click its block. The playhead jumps to its start. |
| Move it in time | Drag the block. |
| Make it longer or shorter | Drag the block's left or right edge. |
| Edit all its settings | Double-click the block, or right-click ▸ Edit Zoom… / Edit Highlight… |
| Delete it | Select it and press Delete, or right-click ▸ Delete Zoom / Delete Highlight. |
Rest the mouse on a block for a reminder of all this.
+ Zoom (Z)
Select a video clip, put the playhead where the zoom should start, and click + Zoom. The window asks for:
- Starts at: when the zoom begins.
- Zoom Duration: how long it lasts (zooming in, holding, zooming out).
- Zoom Depth: 100% is as far as it goes while keeping the target fully on screen; lower is gentler, up to 150% is stronger.
Type values or use − / +. The same window opens when you edit an existing zoom.
+ Highlight (H)
Select a video clip, put the playhead where you want it, and click Add Highlight. The window asks for:
- Starts at and Duration.
- Shape: Rectangle, Rounded rectangle, Circle / ellipse, Arrow (with a direction), or Spotlight (dims everything outside the shape).
- Color, Border width, and whether it pulses.
The highlight then appears in the preview, selected so you can place it:
- Resize: drag a corner square. Move: drag inside the box.
- Color / Border: the Highlight Color… and Highlight Border controls also change the selected highlight.
Double-click a highlight's block to change any of its settings later.
Setting the look for all highlights
With nothing selected, Highlight Color… and Highlight Border change every highlight in the project and become the default for new ones, including auto highlights from future recordings.
10Narration: Text to Speech, Transcribe and volume
Text to Speech (Ctrl+T)
- Put the playhead where the narration should go.
- Click Text to Speech…, type the text, choose a Voice, and use ▶ Preview to listen.
- Click Insert Clip. The clip goes on Narration at the playhead (after the clip under the playhead, if any); later clips move to make room. With several Narration tracks, it goes on the one whose clip is selected.
TTS clips are colored differently, marked TTS, and named after the start of their text.
Change a TTS clip later: double-click it, or right-click it ▸ Edit Text / Voice (regenerate)…. The window opens with its text and voice; edit them and click Replace Clip. The clip is replaced in place, and clips after it move if the new one is longer.
Volume and loudness
All generated speech (Text to Speech and Transcribe voiceovers) is automatically normalized to a standard loudness for online video (about −16 LUFS), so it's as loud as a typical recorded voice.
- Recordings: your recorded narration is brought to the same level automatically when you stop recording (File ▸ Project Settings ▸ Microphone ▸ Even out the volume of each recording).
- Normalize Volume (right-click an audio clip): sets that clip's volume so it reaches the same standard loudness, and tells you how much it changed. Use it on imported audio or older recordings.
- Volume slider: 0% to 400% for the selected clip.
- Volume line (any clip on an audio track: narration, Text to Speech, music or a video's own sound): see below.
- Level meter: shows how loud playback is right now. Green is good, yellow is loud, red means it's close to clipping.
Volume line: louder or quieter at chosen moments
Every audio clip has a thin yellow line across it: its volume over time. The middle of the clip is 100%, the top 200%, the bottom silent. The waveform grows and shrinks with it, so you can see the result.
- Add a point: select the clip, then click on the yellow line. Keep the mouse button down and drag to set the point's volume (a tooltip shows the %). Or right-click the clip ▸ Add Volume Point at Playhead.
- Move a point: drag it left/right (time) and up/down (volume). It clicks onto 100% when you pass it.
- Delete a point: click it (it turns white with a blue ring) and press Delete, or double-click it, or right-click it ▸ Delete Volume Point. Right-click also offers Set Volume… (type an exact %) and Remove All Volume Points.
- Between two points the volume changes smoothly; before the first and after the last it stays level.
Example: to lower music while you speak, add four points on the music clip: two at 100% and two at about 30% under the narration.
Fades. The small white squares at the top corners of a selected audio clip are fade handles. Drag the left one to the right for a fade in, the right one to the left for a fade out; the faded part is shaded. Or right-click ▸ Fade In (1 s) / Fade Out (1 s) (click again to remove). Reset Volume Line & Fades clears everything.
Volume points stay with the sound when you move, trim or split a clip. The volume line is applied exactly the same way when you play the project and when you export it.
Transcribe: fix what you said without re-recording
- Select a narration clip and click Transcribe….
- Edit the text: fix mistakes, reword, add or remove sentences.
- Choose a voice, click Generate Voiceover, then Preview.
- Save replaces the original clip with the new voiceover.
11Subtitles
Subtitles appear on the Subtitles track at the bottom of the timeline and over the preview, including where there's no video (for example narration over a black opening), just as in the exported video.
Subtitle tracks
You can have more than one subtitle track, for example dialogue from the video on one and your narration (or a second language) on another.
- Add one: right-click the Subtitles track's name (or any track name) ▸ Add Subtitles Track.
- Right-click a subtitle track's name to rename it, hide/show it, move it up or down, or delete it. Double-click the name to rename it.
- H on a subtitle track hides it: it isn't shown in the preview, the
exported video or the
.srt. - Drag a subtitle block up or down to move it to another subtitle track.
- When subtitles from two tracks show at the same time, they're stacked, the upper track's line on top.
Creating subtitles
- From speech or a script: right-click a clip on an audio track (narration, Text to Speech, music, a video's sound) ▸ Create Subtitles from This Clip…, or in the Subtitles window click Create from Clip…. A recorded voice is transcribed; a Text to Speech clip uses its script directly, timed over the part of the clip where the voice is heard. Subtitles are split into short, readable lines. With several subtitle tracks, you're asked which one to use.
- Nothing else is removed. Making subtitles from a clip again replaces only that clip's earlier subtitles. If the new lines overlap subtitles made from another clip (or typed or imported) on the same track, you're asked: Keep Both (they're stacked), Replace or Cancel. Undo (Ctrl+Z) restores everything as it was.
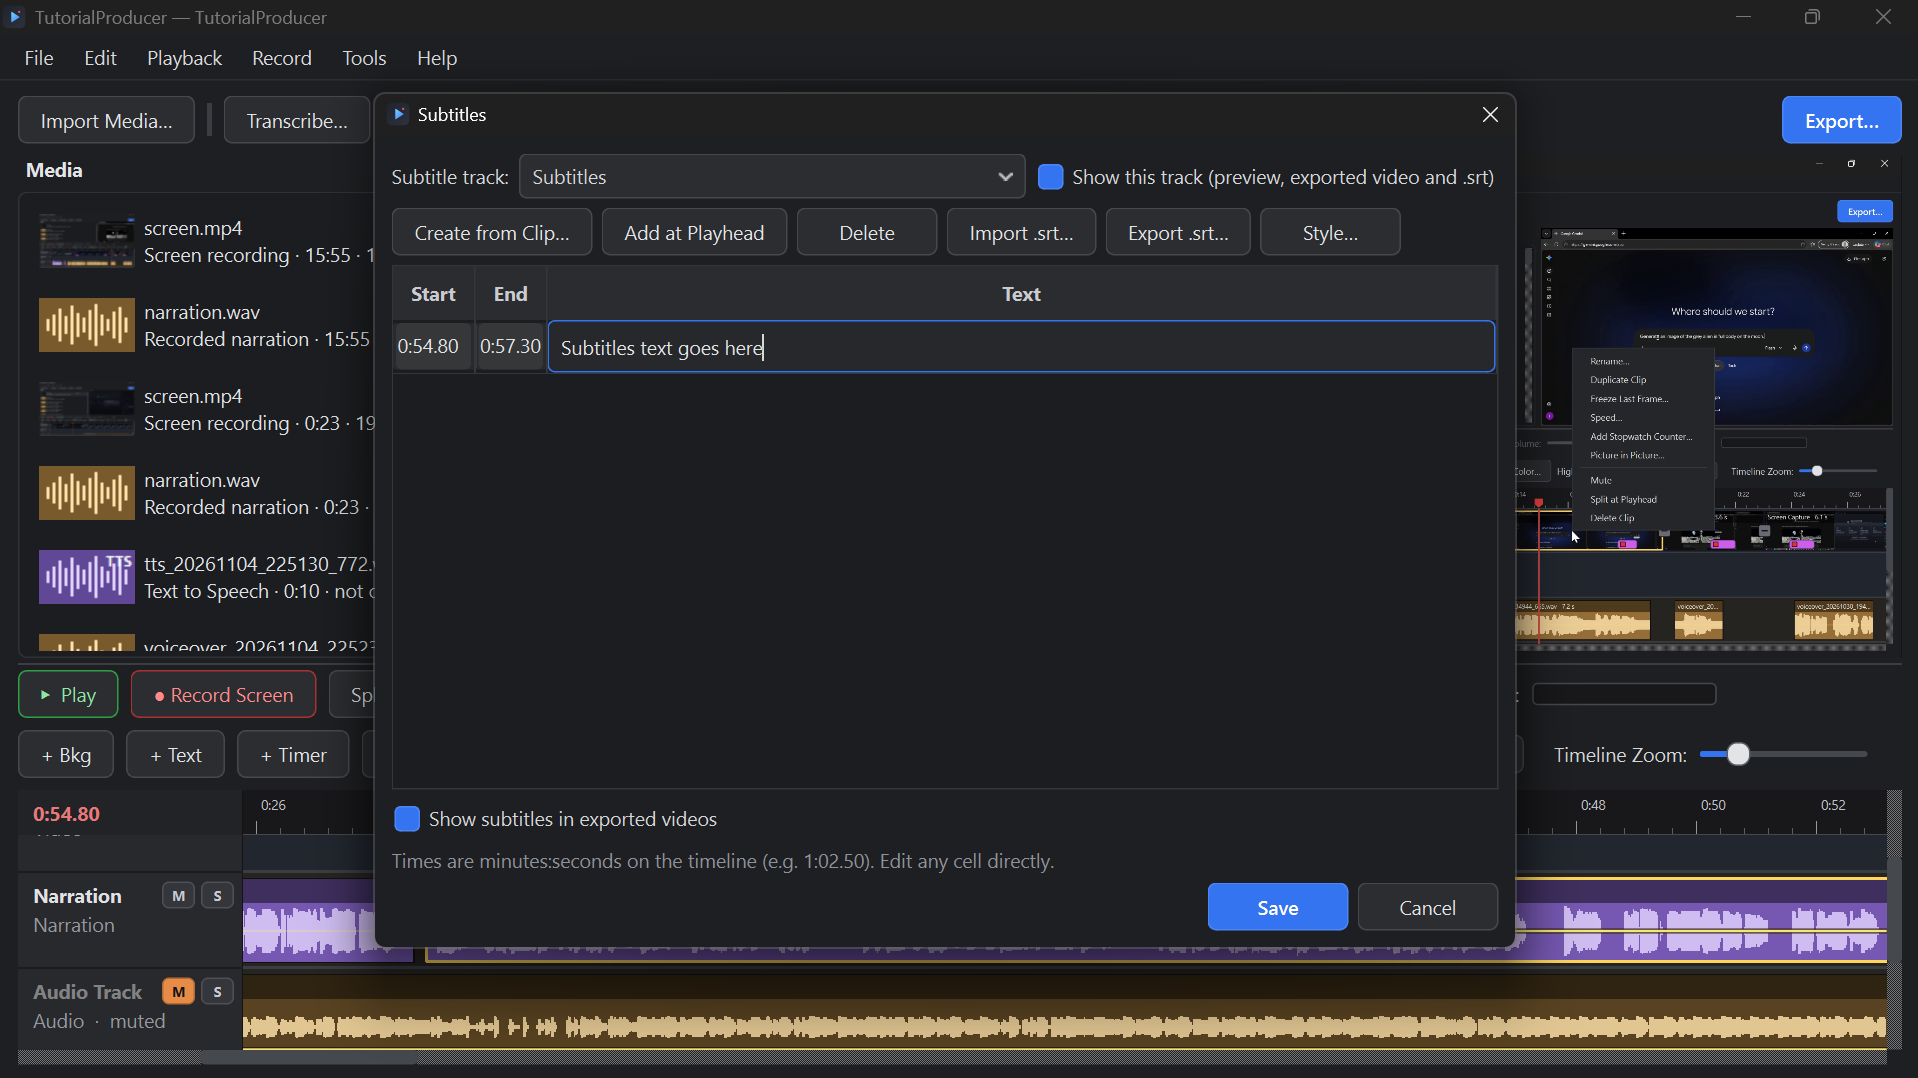
- By hand: open Subtitles… (Ctrl+Shift+T) and click Add at Playhead.
- From a file: in the Subtitles window, Import .srt….
Editing
- The Subtitles… window shows one subtitle track at a time: pick it in Subtitle track at the top (with its own show/hide box).
- Every subtitle is a row with its Start,
End and Text. Click any cell to edit it (times look like
1:02.50). Delete removes the selected rows. - On the timeline, drag a subtitle block to move it, drag its edges to change its timing, and double-click it to edit its text.
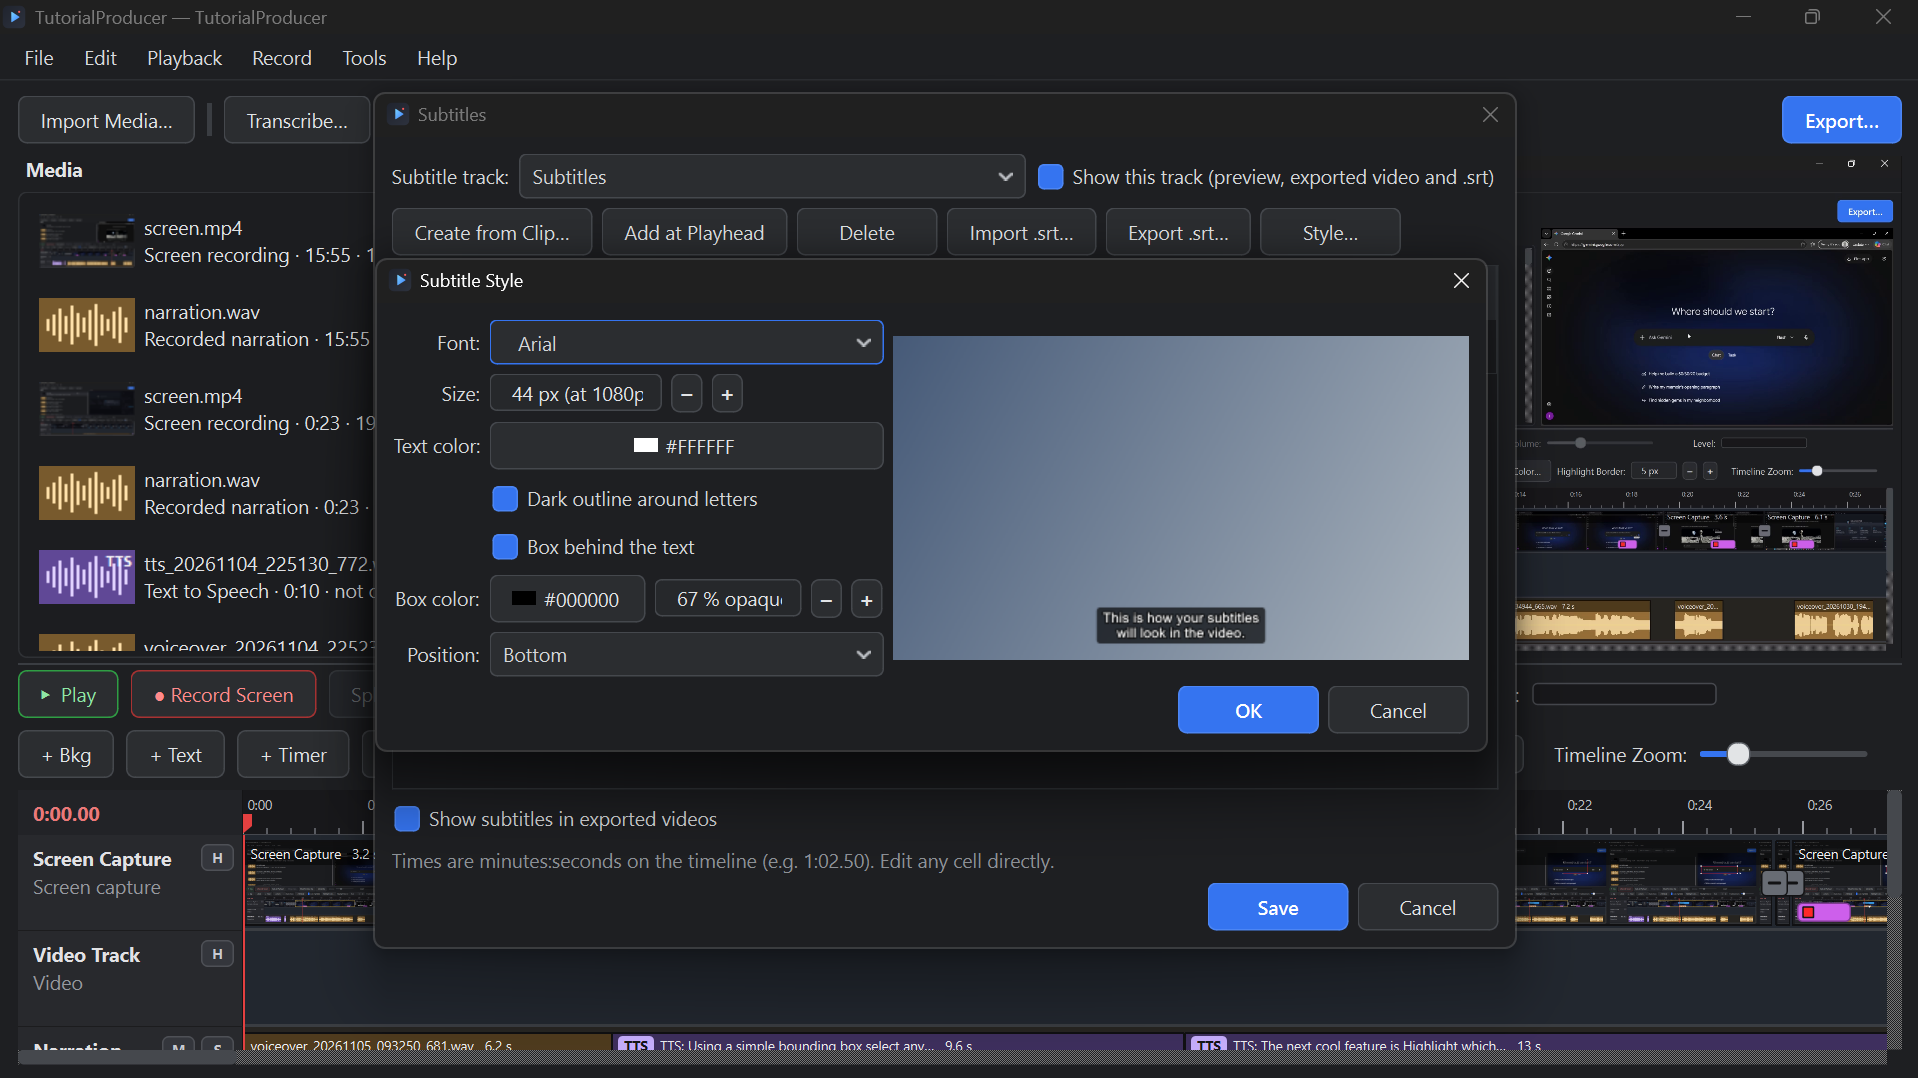
- Style… sets the font, size, text color, outline, background box and position (bottom or top), with a live preview.
In the exported video
- Save one subtitle track on its own: right-click a subtitle (or the subtitle track's name) ▸ Save Subtitles As…. Choose .srt (most players and YouTube), .vtt (web players) or .txt (a plain transcript, text only). The suggested name is the project's name.
- Show subtitles in exported videos (Subtitles window) and Show subtitles in the video (Export window) are one setting: change either and the other follows. It's on by default.
- Also save subtitles as an .srt file (Export window) writes a
separate
.srtnext to the video, for YouTube and other players. Export .srt… in the Subtitles window (the track shown), or File ▸ Export Subtitles (.srt)… (every shown track), saves them at any time without exporting a video. With several subtitle tracks you get one file per shown track: the first asname.srt, the others asname.<track name>.srt. - Subtitle lines in an
.srtnever overlap: if two lines overlap on the timeline, the first ends where the next begins.
11AColor backgrounds and animated text
+ Bkg (a plain color background)
Click + Bkg (in the row with + Text and + Zoom, or Tools ▸ Add Color Background…). Pick a color and how long it should last, then OK. The color is placed on the video track at the playhead and behaves like any video clip: drag it, trim its ends, split it, hide it, and put transitions between it and the clips next to it. Cross Dissolve, Fade to Black and the other transitions all work on it.
- Change the color later: right-click the clip and choose Change Color….
- Make it longer or shorter: drag its ends, like any clip.
- Color clips also appear in the Media library (as a swatch), so the same color can be added again with a double-click.
- Put a color clip on a track above other video to cover it, or leave it on its own to use as a title card background.
+ Text (fun, animated text)
Click + Text (next to + Bkg, or Tools ▸ Add Text…). The text is placed on the Text lanes below the subtitle lane, starting at the playhead and lasting 4 seconds. A new lane is used if the text overlaps another.
In the window that opens, the preview shows exactly what the exported video will show. Press Play to see it move, drag the slider to look at any moment, and drag the text in the preview to move it.
- Fun looks: the box at the top gives ready-made looks (Party, Neon sign, Comic pop, Gold title, Retro arcade, Glitch, Sticker fun, Toothpaste, Balloon, Chrome, Ice, Bold 3D, Typewriter, Clean lower title). Pick one, then change anything you like.
- Font: every font installed on your computer is in the list. Bold, Italic, size and letter spacing are below it.
- Style: Plain, Bold outline, Neon glow, Comic, Retro 3D, Gradient, Gold, Sticker, Glitch, Toothpaste (fat glossy squeezed-from-the-tube letters with stripes), Balloon, Chrome and Ice. Each uses the colors below: text color, outline color, glow/3D/shadow color, and gradient top and bottom.
- Color each letter separately: click a letter (Shift-click for a range, Ctrl-click to add one), then Color selected…. Rainbow and Alternate do whole words quickly; Clear letter colors starts over. Letters you don't color use the Text color.
- Position and timing: across and down (in percent of the frame), a tilt, when the text appears, and how long it stays.
- Animation: choose how it appears and how it disappears, with how long each takes. Whole-text animations: Fade, Pop, Zoom in, Slide from any side, Spin. Letter-by-letter animations: Typewriter, Letters drop, Letters pop, Letters rise, Letters spin, Letters fade. While showing, the text can Wave, Pulse, Wiggle or cycle through Rainbow colors.
On the timeline: drag a text block to move it (or drag it to another lane), drag its ends to change how long it stays, double-click to edit it, right-click for Edit, Duplicate and Delete, and press Delete to remove the selected one.
Text is drawn over the video in the preview and is always included in the exported video.
11BSelecting and merging clips
Selecting several clips
- Drag a box: press the left mouse button on empty timeline space (for example an empty part of a track) and drag. Every clip the box touches is selected, on any track. Hold the mouse near the left or right edge and the timeline scrolls. Hold Ctrl or Shift while you start the box to keep what is already selected and add to it.
- Ctrl+A (Edit ▸ Select All Clips) selects every clip on every track.
- Ctrl+click a clip adds it to, or removes it from, the selection.
- Selected clips move together when you drag one of them; Delete, Copy and Merge Clips work on all of them. Click empty space without dragging to clear the selection.
Merge several clips into one
Select two or more video clips, or two or more audio clips, and click Merge Clips (or Edit ▸ Merge Clips, Ctrl+J, or right-click ▸ Merge Selected Clips). - Video clips: the clips are combined, together with their own sound, into one new video file covering from the start of the first to the end of the last. Gaps between them become black and silence. The merged clip lands on the first of their tracks, with its sound on the sound track the clips used. Speed changes, volume, fades, zooms, highlights and transitions between the clips are baked in. Subtitles, text and stopwatch counters stay as they are, in their same places. Other clips lying on top (for example a picture in picture) are only included if you selected them. - Audio clips: the sounds are mixed down (clips on different tracks that overlap play together, each at its own volume) into one new sound file and one clip. - Choose either video or audio clips, not both. A video clip's own sound is merged with it automatically, so selecting both a picture and its linked sound is fine. - A progress window shows while it renders; video takes about as long as exporting that part. Undo brings the separate clips back. The original files are never changed. The merged file is saved in the app's data folder and kept with the project. - Once merged it is a normal clip: move, trim, split, speed up, copy or delete it. Zoom and highlight blocks that were on the old clips are now part of the picture and can't be edited separately.
11CSpeed, freeze, stopwatch and deleting clips
Speed up or slow down a clip
Right-click a clip and choose Speed… (or Tools ▸ Clip Speed…). Pick a preset (0.25x to 100x) or type an exact value in the Exactly box (or use its − and + buttons; the steps get bigger as the speed grows, so reaching 100x takes only a few clicks). Picture and sound change speed together, and a linked video/audio pair changes together. A sped-up clip gets shorter and a slowed-down one longer; everything after it moves along, and subtitles, text, zooms and highlights stay on the same moments of the video. "Keep the voice's pitch" avoids a chipmunk or deep-voice effect. A small badge such as "2x" appears on the clip. Transcribe needs the clip at 1x.
Freeze the last frame
Right-click a video clip and choose Freeze Last Frame…. Choose how long in hours, minutes and seconds (use the − / + buttons or type), then OK. The clip plays out as usual and then its last picture stays on screen for that time. The frozen part is shaded and labelled "Freeze …" at the end of the clip. - Text, subtitles and stopwatch counters that run to the end of the clip carry on over the frozen picture, animated and counting as if it were still playing (a stopwatch keeps counting). Anything that sat inside the clip stays where it was. - Clips after it move later by the same amount, on every track, with subtitles and text after the clip. The clip's own sound ends with the footage, so the frozen part is silent unless something else (music, narration) plays there. - The clip's right edge now stretches or shrinks the freeze. Split at Playhead works only in the footage part; the freeze goes with the right-hand piece. Open Freeze Last Frame (now …)… again and set 0 to remove it.
+ Timer (stopwatch counter)
Number boxes in the Text, Subtitle, Zoom, Highlight and Speed windows all use − and + buttons beside the box. You can also click in the box and type.
Select a video clip and click + Timer (or right-click ▸ Add Stopwatch Counter…). A stopwatch appears in the middle of the picture for the length of that clip. It reads hours:minutes:seconds (for example 00:12:05, no fractions), shows the footage's own elapsed time and restarts at 00:00:00 at the start of the clip, so on a sped-up clip the seconds race by. A clip can have only one stopwatch (different clips can each have their own). Once a clip has one, the clip's right-click menu shows Remove Stopwatch Counter instead of Add; you can also select the stopwatch in the text lane and press Delete. Tools ▸ Remove All Stopwatch Counters clears every stopwatch in the project at once. It is a normal text item: change the font, colors, size, position and animations in the dialog, and drag it on the timeline like other text.
Deleting a clip closes the gap
Deleting a clip (Delete key or right-click ▸ Delete Clip) and choosing Delete All removes the empty space too: clips after it move earlier, and clips on every other track, subtitles, text, zooms and highlights shift by the same amount so they stay lined up with the video.
Moving several clips to another track at once
Select several clips on the same track (drag a box around them, or Ctrl-click) and drag one of them up or down onto another track of the same kind (video to video, audio to audio). All the selected clips move to that track together and keep their places in time (later clips on that track make room if needed). If the selection spans different tracks, the clips still move together sideways but stay on their own tracks. A video's linked sound that you did not select just moves sideways with it, as it does for a single clip.
Deleting just the picture or just the sound
The delete question always offers Delete All, Delete Only Video (if you selected a video clip) or Delete Only Audio (if you selected an audio clip), and Cancel. "Only" removes just that clip, not its linked picture/sound partner (which stays where it is and is no longer linked), and does not close the gap, so nothing else moves. Undo (Ctrl+Z) brings anything back.
Duplicate Clip, and dragging an edge into a neighbour
- Right-click a clip ▸ Duplicate Clip puts a copy right after the original (with its linked sound or picture). The Copy/Paste clipboard is not touched.
- Trimming works both ways even when a clip touches its neighbour. Drag a clip's end edge out (as far as its video/audio goes) and the clips after it move later to make room; drag its start edge out and the clip before it gets shorter (it is never removed). Drag an edge in to trim it shorter, as before. The small "−" icon that sits on the join is a transition button; grab the edge just beside it, not the icon.
Inserting a clip between two clips
When you drag a clip from Media onto the timeline between two video clips, the later video clip moves right to make room, and everything after that point moves with it: its own sound, narration, music and sound-effect clips, text, and subtitles. Everything stays in step with the video it belongs to. Clips that start before the insert point stay where they are. Dropping into an empty spot (or after the last clip) moves nothing.
Looping part of the timeline
Like in a music editor, you can pick a stretch of the timeline and have Play repeat it:
- Drag in the top strip of the ruler (the row with the time numbers) from where the loop should start to where it should end. An orange band appears on the ruler and a light orange tint over the tracks.
- Press Play. When playback reaches the end of the band it jumps back to the start and keeps going, until you press Pause. If the playhead is outside the band when you press Play, playback starts at the beginning of the band.
- Drag the band's edges to resize it, or its middle to move it. Dragging in the top strip outside the band makes a new one.
To remove the loop, double-click the orange band on the ruler. (Right-click the ruler ▸ Clear Loop Region does the same.)
Press L (or Playback ▸ Turn Loop On / Off) to switch the loop off and on without losing the band; it turns gray when off. Right-click the ruler for Turn Loop On/Off, Loop Selected Clip (loops exactly the selected clip) and Clear Loop Region. A plain click in the ruler still just moves the playhead, and the bottom half of the ruler (with the red handle) still scrubs. The loop is saved with the project, is for previewing, and you can also export just the loop area (see "Exporting just the loop area" in the Exporting section).
Choosing what a zoom goes in on
Click a Zoom block on the timeline (or double-click it to open its settings; the settings window stays open so you can still use the preview) and a blue box appears over the preview. Drag the box over the object you want to zoom in on and drag its corners to fit the object. The zoom goes in as far as it can while the whole box stays on screen, so a small object is zoomed in more and a large one less. While you place the box the preview shows the whole picture; play the video to see the zoom itself. The Zoom Depth in the zoom's dialog (double-click the block) still scales the zoom: 100% means as close as possible with the box fully visible.
Fade in from black and fade out to black
Right-click the very first video clip and choose Fade In…: the whole picture fades from black into the video over the number of seconds you pick (default 1 s). Right-click the very last video clip and choose Fade Out… to fade from the video into black at the end. These two options only appear on the first and last video clip. Once set, the menu shows the length ("Fade In (now 1 s)…") and a Remove Fade In / Remove Fade Out option. The fade covers the picture only (not the sound) and shows in the preview and the exported video.
Audio files with cover art
An MP3 (or other audio file) that has a cover picture inside is now treated as audio only; no video clip is added for it.
12Exporting the finished video
Click Export… (Ctrl+E, or File ▸ Export Video…). The Export Video window opens first so you can check the settings; nothing is exported until you click its Export… button. Choose:
| Setting | Choices |
|---|---|
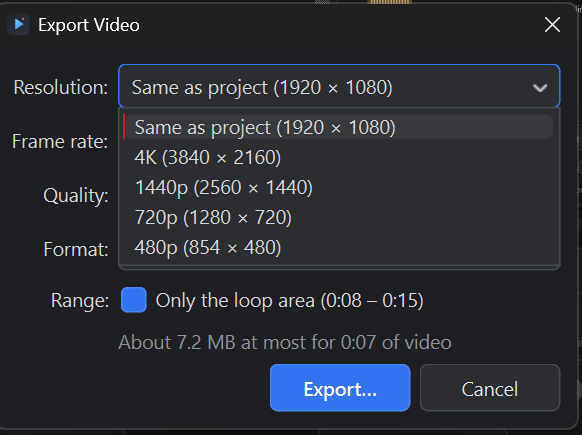
| Resolution | Same as project, or 4K, 1440p, 1080p, 720p, 480p |
| Frame rate | Same as project (recommended: matches your footage exactly, e.g. 29.97), or another rate |
| Quality | Low, Medium, High (recommended), Maximum |
| Format | MP4 (plays everywhere) or MOV; or Audio only — WAV (uncompressed) or Audio only — M4A (AAC, small file) |
| Subtitles | Show them in the video; also save an .srt (these two options only appear when the project has subtitles) |
| Range | Only appears when a loop area is switched on: Only the loop area (m:ss – m:ss), ticked by default |
An estimate of the file size is shown. Click Export… and choose a file name. If the file already exists you're asked before it's replaced. A progress bar shows how far along it is and about how long is left; the rest of the window stays responsive, and Cancel stops the export and removes the unfinished file. If the video encoder ever stops responding, the export is stopped after a while with a message instead of hanging. You can export as many times as you like in one session. Everything you see in the preview is included.
Exporting just the loop area
To export only part of your video, drag in the top strip of the timeline ruler to choose a loop area (the orange band; see "Looping part of the timeline"). With the loop switched on, click Export…: the Export window shows Range: Only the loop area (start – end), ticked. The finished MP4 (or MOV, WAV or M4A) contains just that stretch, starting at its beginning, with the sound, text, subtitles, zooms and highlights from that stretch. A saved .srt file is cut to the same part and starts at 0:00. Untick the box to export everything as usual, or press L (or double-click the band) to turn the loop off or remove it first. The loop area is only ever used for export when its box is ticked.
The video is exported at a steady frame rate equal to your footage's, so motion is as smooth as the original. When it's done, the message shows where the file is, its size in pixels, its frame rate and the video encoder used; click Open Folder to open the folder it was saved in (on Windows, in File Explorer with the file selected).
Audio only
Choose Audio only — WAV or Audio only — M4A in Format (or use File ▸ Export Audio Only…, Ctrl+Shift+E) to save just the project's sound: exactly what you hear when you play it, with all tracks, volumes, volume lines and fades. The picture settings are greyed out.
To save one clip's sound on its own (for example a Text to Speech
voiceover), right-click it ▸ Save Clip Audio As… and pick WAV or M4A.
It's saved at that clip's own volume, without the rest of the project.
The suggested name is the clip's name without the video's extension
(for example Sintel_trailer.wav, not Sintel_trailer.mp4.wav).
13Keyboard and mouse reference
Help ▸ Keyboard Shortcuts (Ctrl+/) shows this list in the app.
| Action | Keys |
|---|---|
| Play / Pause | Space |
| Previous / next frame | Left / Right |
| Back / forward 1 second | Shift+Left / Shift+Right |
| Go to start / end | Home / End |
| Select all clips on every track | Ctrl+A |
| Copy / paste the selected clip | Ctrl+C / Ctrl+V |
| Merge the selected clips into one | Ctrl+J |
| Split at Playhead | S or Ctrl+B |
| Mute/Unmute Clip | M |
| + Zoom / + Highlight | Z / H |
| Delete selected effect, subtitle, text or clip | Delete |
| Undo / Redo | Ctrl+Z / Ctrl+Y (or Ctrl+Shift+Z) |
| New / Open / Save / Save As | Ctrl+N / Ctrl+O / Ctrl+S / Ctrl+Shift+S |
| Import Media | Ctrl+I |
| Export | Ctrl+E |
| Export Audio Only | Ctrl+Shift+E |
| Start / stop recording | Ctrl+R (in the app), Ctrl+Shift+R (from any program, Windows) |
| Text to Speech / Subtitles | Ctrl+T / Ctrl+Shift+T |
| Zoom timeline in / out | Ctrl+= / Ctrl+− |
| User Guide | F1 |
| Mouse | Does |
|---|---|
| Drag the red playhead line (anywhere) or the ruler | Move the playhead |
| Drag a clip | Move / reorder it (drop on a clip's first or second half to go before or after it) |
| Drag a library item onto a track | Add it to the timeline |
| Drag an effect, subtitle or text block / its edges | Move it / change its length |
| Drag a subtitle block up or down | Move it to another subtitle track |
| Drag a text block up or down | Move it to another text lane |
| Drag either end of a clip | Trim it (drag back out to restore) |
| Click the yellow volume line of a selected audio clip | Add a volume point (drag to set it) |
| Click a volume point, then Delete | Remove that point |
| Drag / double-click a volume point | Move it / delete it |
| Drag the white squares at an audio clip's top corners | Fade in / fade out |
| Double-click an effect, subtitle or text block | Edit it |
| Right-click a clip (Speed…, Add Stopwatch Counter…, Delete Clip), effect, track header, subtitle, text or transition icon | Its menu (a color clip's menu has Change Color…; a text's has Edit, Duplicate, Delete) |
| Right-click a subtitle or a subtitle track's name | Save Subtitles As…, subtitle track options |
| Drag a track's bottom edge | Resize the track |
| Ctrl+click | Select several clips |
Single-letter shortcuts don't fire while you're typing in a text or number box.
14Update notices
When TutorialProducer starts, it quietly checks toolcorral.com for news about the app, such as a new version. If there is something new, a short message appears with a button (for example Get Update, which opens the download page in your web browser) and Cancel. Each message is shown only once: whichever button you click, it won't appear again. Nothing appears if you already have the version the message is about, and if your computer is offline the check is simply skipped. The check never sends any of your projects or files anywhere.
15If the app crashes
The app saves a crash report automatically. The next time you open it, a
message tells you where the report is and offers to open its folder.
Please send the .txt file, and the .dmp file next to it if there is
one. If you had unsaved work, the app also offers to recover it from the
autosave.
If the app stops responding for 15 seconds or more ("Not Responding"
on Windows, a spinning wheel on a Mac), it writes a freeze report
(freeze_….txt) in the same folder. If you then have to close it, the
next start tells you about the report; please send it the same way.
Where the reports are:
| System | Crash and freeze reports | What's in them |
|---|---|---|
| Windows | %APPDATA%\TutorialProducer\crashes (paste it into File Explorer's address bar) |
A .txt with the place where it stopped, and a .dmp with every part of the app at that moment |
| macOS | ~/Library/Application Support/TutorialProducer/crashes (in Finder, Go ▸ Go to Folder…, then paste it) |
A .txt with the place where it crashed. A freeze report records when and what was happening, but not where it was stuck |
| Ubuntu | ~/.local/share/TutorialProducer/crashes (in Files, press Ctrl+H to show hidden folders) |
Same as macOS |
macOS also keeps its own report of a crash. If the app quits unexpectedly and macOS offers to Report…, you can click Report… and copy that text too. Its own copies are kept in Console ▸ Crash Reports.
16Known limitations
- Zoom target: a zoom's aim can't be dragged in the preview. Zooms you add by hand aim at the center; auto zooms aim at what you clicked.
- Clip speed runs from 0.1x to 100x. Transcribe and Create Subtitles from a clip need the clip at 1x; set it back first.
- Stopwatch shows the clip's own elapsed time as HH:MM:SS (no fractions); it follows one clip, so after you speed up or trim that clip it updates itself.
- Global record shortcut (Ctrl+Shift+R from other programs) is Windows only. If another program already uses that shortcut, use the Record Screen button or Ctrl+R instead.
- Subtitles from speech need clear speech; check and correct the text in the Subtitles window before exporting.
Get in touch
Questions before you buy, a bug to report, or a feature you'd like to see on macOS and Linux first — send it over and we'll get back to you.